As with all unfamiliar distros, the first step was to try it out on a different hard drive, just in case there was anything hidden away that might blow my multiboot setup up. I dug out a spare SATA drive, stuck a SATA-to-USB converter card on the back, and plugged it into a spare USB slot. The trial installation off the live DVD to /dev/sda1 was unexceptional and ran harmlessly for a few hours. Time to get real.
Starting off the live DVD asks for a few basic parameters before presenting a live desktop with an icon to start the installation. This then proceeds in the old-fashioned way via a sequence of dialogue boxes for each individual step, rather than the much preferable single-page menu with all the steps visible at once, and revisitable at will before the irrevocable writing to the HDD begins. You can't select the system language as UK English here, because that forces the keyboard to be UK also; best to leave both as US English, as that's what the keyboard is. No matter. Another F-key then allows selection of the time zone. No cool world maps here, just a list of city names, but quite easy to use.
The next box asks what disk is to be installed to, /dev/sda1 (I hadn't bothered to disconnect it) or /dev/nvme0n1? Select the latter and select "custom install on existing partitions". (I want to put root on nvme0n1p11.)

Now you get a box to choose the partitions you want to install to.

But... where are partitions ten onwards? Could it be that they have no filesystems defined (...but nvme0n1p3 doesn't either and it appears)? Just in case, CTRL-ALT-F2 into a terminal screen and make an ext2 filesystem on nvme0n1p11. It doesn't help.
Oh, well... a flag might have been set somewhere. Start the installation from scratch a second time to see if that helps. Not only does it not, but now the option to do a custom install is gone from the menu! Only destroying my multiboot setup with an install over the entire nvme0n1 drive is possible.

Boot Mint instead and zero nvme0n1p11, removing the filesystem. Now start the installation a third time. Still no custom install option, so it's not the contents of the partition which are causing the problem. Go back to Mint and remove partitions 10 to 12 altogether. Then start the installation for the fourth time. Still no custom install option, so it's not the existence of the partition(s) which is causing the problem. Go back to Mint once more and put partitions 10 to 12 back in again, returning on the face of it to the exact situation with which we started, before starting the installation for the fifth time. Still no trace of the custom install option. What the hell???
Think... think... think... we've pretty well ruled out a software flag on the multiboot setup, and the installation starts off ROM. Could it be a hardware "flag"? Hmm, before doing the second installation attempt, I disconnected the USB HDD with the test installation and put it away. Could that be a factor? Connect the test drive again and start the installation for the sixth time. The option to do a custom install is back from the dead, and half a day has been wasted. The list of partitions still stops at number 9, mind you.
What is one to think of software like this? Did nobody think of trying a custom installation to an NVME drive before letting it out the door? Probably not, if the story of all the distros I've tried before is anything to go by. And why does it not allow partitions beyond 9? Systems with partitions up to hda16 have been possible since, like, forever. I could install Ubuntu 11.04 to sda17 back in 2011, for God's sake. Couldn't they just copy the relevant bits of software from some other distro?
Interestingly, the custom option is missing (both from the graphic and the text) in the section of the MX User Manual devoted to the installation process, so this problem has been around for a while.
Anyway, I had to give up on installing MX Linux where I wanted to, and settle for the only empty partition it could see, nvme0n1p3. Nothing terribly wrong with that, just that it was about five GB bigger than necessary. Apart from root, only a few standard directories can be assigned their own partitions.
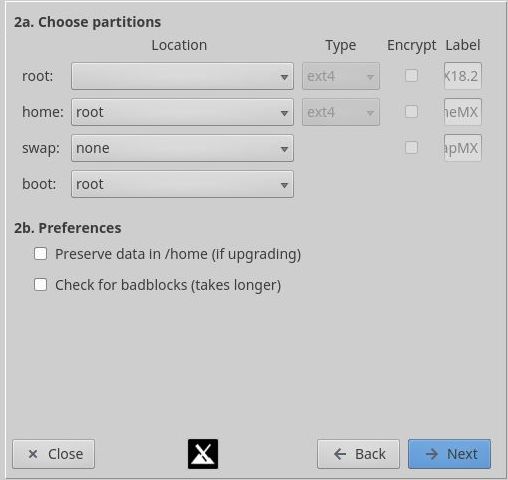
I will have to add my common data partition /user to /etc/fstab myself later. No problem. The rest of the installation proceeded uneventfully. It does ask before starting to write to nvme0n1p3; then the remaining questions about booting, localisation etc. are asked while the writing is in progress. Soon I had it set up with my usual preferences. The default colour choices were rather dark, but it was possible to adjust icon sizes etc. reasonably well on the 4K monitor.
Sound
Now it was time to make everyday use of MX to see how it went. The first thing I noticed was that sound worked every time I started MX, but soon disappeared without any obvious reason. It worked perfectly well on Mint 17.3, and why wouldn't it? I have no special sound card, just the default analogue output from my (modern, common) motherboard. I know next to nothing about Linux sound software because I have never needed to; it has more or less worked on pretty well any distro where I wanted it without my needing to do anything. Now I would have to do some unwanted sleuthing.
First, from MX's launcher, select MX-Tools - MX Select Sound...

Oh, OK. "HDA Intel PCH" is what the system reports at startup (in the dmesg log). So, select it. It's the only thing offered anyway...

Now you can test the sound card. But... this whole function was effectively a dummy. It never made any difference to whether the sound was working or not. If the sound was already working, testing would make a sound, and if not, it wouldn't.
Fishing around for a command to see where my sound was going, I hit upon pactl list sinks. This outputs too much technical information, but fortunately there was pactl list short sinks for clarity. Right after the system was started, this is what I got:
> pactl list short sinks
0   alsa_output.pci-0000_00_1f.3.analog-stereo  module-alsa-card.c  s16le 2ch 48000Hz  SUSPENDED
...and the sound was working. I happened to lock the screen and when I came back, the sound was gone, and this is what the command showed:
> pactl list short sinks
2   alsa_output.pci-0000_00_1f.3.hdmi-stereo-extra2  module-alsa-card.c  s16le 2ch 44100Hz  SUSPENDED
What? Where had sink 0 gone? Piqued by the oddness of it, I locked the screen once more, and when I unlocked it again...
> pactl list short sinks
6   alsa_output.pci-0000_00_1f.3.hdmi-stereo-extra2  module-alsa-card.c  s16le 2ch 44100Hz  SUSPENDED
6??? Weird. Try locking and unlocking a few more times. The (sole) sink number goes to 10, 14, 18... But that was not all. Even on an idle system, the sink number crept up and up until until it was in the hundreds. God knows what events were triggering the increments. Of course, all the new sinks were for this hdmi-stereo-extra2 output, which was presumably why nothing was coming out of my speakers.
I fished around on the Internet for commands which might plausibly have an effect.
> pacmd set-default-sink 0
Sink 0 does not exist.
This command is accepted when the sink number input is the one actually showing in the list; even then, it doesn't actually do anything, since the sink number continues merrily on its way. Why can you specify a number for a system parameter whose numeric identifier is not persistent? In any case, it seems that you can use identifying names instead. So, start again.
> pactl list short sinks
0   alsa_output.pci-0000_00_1f.3.analog-stereo  module-alsa-card.c  s16le 2ch 48000Hz  SUSPENDED
> pacmd set-default-sink 'alsa_output.pci-0000_00_1f.3.analog-stereo'
(ACCEPTED)

> NOW LOCK/UNLOCK THE SCREEN TO PROVOKE THE CONDITION, THEN...

> pactl list short sinks
2   alsa_output.pci-0000_00_1f.3.hdmi-stereo-extra2  module-alsa-card.c  s16le 2ch 44100Hz  SUSPENDED
> pacmd set-default-sink 'alsa_output.pci-0000_00_1f.3.analog-stereo'
Sink alsa_output.pci-0000_00_1f.3.analog-stereo does not exist.
Whaddya mean, it doesn't exist? Try a different command...
> pacmd set-card-profile 0 output:analog-stereo
> pactl list short sinks
4   alsa_output.pci-0000_00_1f.3.analog-stereo  module-alsa-card.c  s16le 2ch 44100Hz  IDLE
This does restore sound (with a different sink number), but only until the sink number gallops off again. This is hopeless...
What about configuration files? There is ~/.config/pulse/...default-sink which lists alsa_output.pci-0000_00_1f.3.analog-stereo as the default for this user, even when other parts of the system say that it doesn't exist any more. Then there's the system-wide /etc/pulse/default.pa with about three dozen configuration options. I can't remember any more all the entries I fiddled with in the vain hope of making a difference, but I spent a lot of time trying things out.
It was on sites like this one where I finally began to get the idea that the whole sink number business was a snare and a delusion, even though I didn't actually find the solution there. Further groping led me to another bug forum, again not for the problem I had, but containing the observation that
module-switch-on-port-available should not automatically change the card profile from analog to hdmi.
Now I had seen this module in /etc/pulse/default.pa, so faute de mieux, I disabled it there and, gratifyingly... the sound was back for good, through reloads and all.
Printing
Next it was time to try to use my HP Laserjet printer. Although the dmesg output showed that the device had been recognised, an attempt to print a page from LibreOffice Writer didn't succeed. Time to look at the printer configuration options. The basic settings looked OK:

However, a look at the printer "policies" box revealed the reason... the initial state was set to "not accepting jobs". Ticking the relevant box fixed the problem.
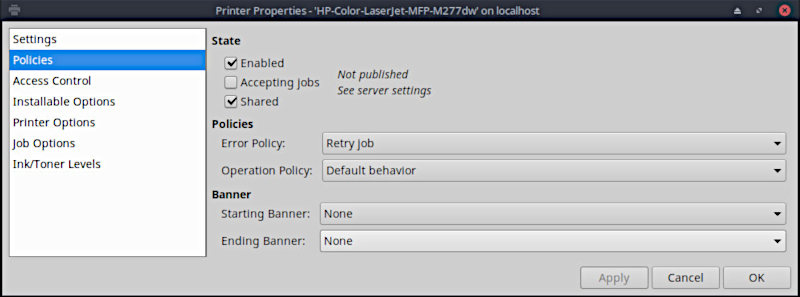
For the console lpr command to work without having to name the printer, it was necessary to do one more thing... go back into Printer Settings and set the HP as the system-wide default printer. Then everything was OK, after an amount of work which it would not be unreasonable to expect even from a beginner. An awful lot better than the sound case above anyway.
File Manager Icons
The next thing slightly out of kilter showed up when looking at some images processed by a GIMP script in the file viewer Thunar. In the following screenshot, the TIFF images are the originals and the JPEGs have been produced by a GIMP batch script whose function need not concern us here. The antelope JPEGs were produced by the script on Mint's GIMP 2.8 and the tree ones on MX's GIMP 2.10. The images themselves display perfectly well in file viewers and in the GIMP, both here and on other distros; the icons generated for them are also correct in other distros' file viewers, but in Thunar the GIMP 2.10 ones are not. Worse, the x00935.jpg one sometimes has the enclosed picture, sometimes not. If you fish the icons out of the thumbnail directory and inspect them with ImageMagick's convert command, the orientation is "undefined" for all, and the dimensions are indeed transposed for the two rotated ones. For the vast majority of images (photographs, images off the Net...), this will not be an issue, but it doesn't inspire confidence all the same.

On the plus side, the version of the GIMP with this distro can process 16-bit colour, and save it to formats like PNG which allow it, something I have been waiting for for about ten years.
Session Locking and Screen Saving
Sometime in the middle of doing all the above, I noticed that the display was never being blanked, and the session lock was never being invoked, even when the system was left to run overnight. So... fire up the "settings" part in the Start Menu and choose Xfce Power Manager. The default settings (first time I've looked at them) include ten minutes for blanking the screen, but automatically locking the session is set to "never". OK, but why wasn't it at least blanking the screen? I fiddled with a few settings, and in particular, set automatic locking for ten seconds after the screensaver is activated, but after a while, it was clear that nothing had changed. So began the usual rounds of fruitless online searches; the trouble with a name like "MX" is that search engines given "MX Linux no screenlock" or the like tend to think that "Mint Linux no screenlock" or even "some-other-distro Linux no screenlock" is near enough, so I got a lot of results for Ubuntu etc. They were all useless anyway.
What does the MX User Manual say? Well, in section 3.3.5 ("Power Management") it says
Click the Power Management plugins icon in the Panel. Here you can easily switch to Presentation mode...
Aha... "Presentation Mode" (not explained in the manual) is presumably where you don't want screensavers or session locks to interrupt you in the middle of a talk. Well, there can be a Power Management icon in the Panel if you fish it out of the Start Menu and put it there yourself, but I could find no evidence that such a thing as a Power Management plugins icon even existed. Did I need to install some plugins?
> apt -qq list xfce4-power-manager-plugins
xfce4-power-manager-plugins/stable,now 1.4.4-4 amd64 [installed]
Nope, they're there, whatever they are. Another search for an example finds in Xfce's documentation an image of a dropdown menu for a Power Manager Panel Plugin, looking like this:

...with an instruction to click on the battery icon in the panel to see it. Of course, there is no such icon for me; my PC is not a laptop.
But is this Presentation Mode setting on? Search for a suitable command (I'm not familiar with Xfce), and...
> xfconf-query -c xfce4-power-manager -p /xfce4-power-manager/presentation-mode
true
Can we toggle it? Yes, we can:
>xfconf-query -c xfce4-power-manager -p /xfce4-power-manager/presentation-mode -T

>xfconf-query -c xfce4-power-manager -p /xfce4-power-manager/presentation-mode
false
And it was the cause of the problem, because now screen blanking and session locking are working in accordance with the parameters set in Power Manager.
Conkies
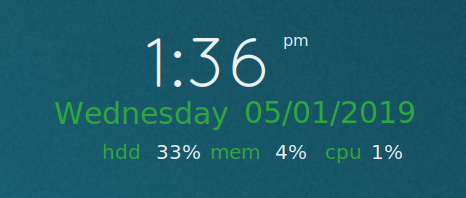
Conkies are graphical tools which display system information on your desktop in real time. They are driven by scripts which can be very complex, but a basic one is provided by default in the MX 18 installation. The default one looks like this:
Unfortunately, it occasionally looks like this after a reboot:

The background is not transparent as it should be, and each successive update is just superimposed on the previous ones without overwriting them. I have no idea what the cause is. Of course, I would like a 24-hour clock, and the date in European order; also the system uptime would be nice. Is there a way to do it? Well,
The app called MX Conky works in conjunction with Conky Manager to manipulate details of a conky, especially colour, in the MX conky collection very easy
...says the User Manual encouragingly, if not very Englishly. Let's fire it up and see...

All it can do is change the day name and the month format; there is nothing about the time at all. Useless. The edit button takes you into a text editor window, but you are better off doing that in a console window, where you have more control and can use your favourite editor. If you are geeky enough to be happy modifying the complex script defined for even this simple conky, you will certainly be at home issuing console commands. Anyway, after a fair amount of fiddling, I had my conky the way I wanted it:

Verdict
After all the above trials, MX looks to be nearly ready to take over the mantle of default distro from Mint 17.3. Given that I don't spend my whole life installing distros, nearly a month has elapsed since I started installing MX. That's far too long, and it's what keeps me cautious about trying new distros. Past experience is that too many releases don't give happy results.
For all the criticisms above, there's a lot that works. The user experience isn't as polished as Mint's, but MX feels nippier. The default colour scheme is too dark, and so are many of the alternatives. There is too much reliance on greyed-out looking fonts in headers and menus, which could lead to eye strain. Nevertheless, there's a good chance that one theme will be good enough.
